

Floodlight Tags Implementation and Configuration
Floodlight tags are used to track and report conversions in Campaign Manager, Display & Video 360 (DV360), and Search Ads 360 (SA360). Floodlight uses activities, tags, and lookback window to count conversions.
A Floodlight activity is a specific action you want to track, such as purchases or sign-ups. For each action you want to track, you create a separate Floodlight activity. Then, DoubleClick automatically generates a Floodlight tag for each activity, you need to place this tag onto a page on your site.
Floodlight has two types of activities:
# Transaction: to track the number of sales made or items sold. It also captures the value of the transactions or the items sold which is the revenue.
# Action: count the number of times that users have visited a particular web page after seeing or clicking on one of your ads. This can be used to count how many users subscribed to your newsletter.
In this article, we will be covering all the steps to set up, place, and configure the transactions/sale floodlight tags on your website. So, let’s get started.
A- Create a Floodlight Activity Group
You need to have at least one activity group before you can create any Floodlight activity. You can think of this group as a folder of your conversion types. For example, you can create one group for shopping activities like Add to Cart, Purchase, …etc. And another group for other website actions like Sign-ups, Newsletter Subscriptions..etc.
1- Sign in your CM and Navigate to Advertisers.
2- Select Floodlight Activity Group.
3- Click add New and then Name your Activity Group.
4- Select your Tag Type, if it’s a transaction-based, it should be Sales. Otherwise, select Counter.
5- Finally, enter the group tag string, which the Floodlight servers use to identify the activity group. Because Floodlight servers use the group tag string to identify the activity group, the string needs to be unique within the advertiser. For example, to create a string you could use (e.g., tans1, trans3 ).
B- Create Floodlight Activity and Tag
After you completed creating the activity group, it’s time now to generate floodlight tags.
1- Navigate to the Floodlight Activities tab.
2- Name your Floodlight Activity.
3- In the expected URL, enter the URL of the page where the tag will be placed. If the page URL is not static and changes whenever someone places an order, you can just put your website domain name. This is just used for information purposes for DoubleClick and has nothing to do with the actual tracking triggers.
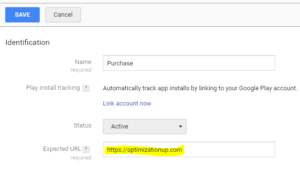
4- After you select your tag type, from the activity group drop-down menu, choose the activity group we’ve created in step one (above).
5- Finally Save.
C- Install the tag on the Website
There are two ways to add Floodlight tags to your website; the old way which is hard coding the tag and places it on the web page where the activity happens. In this case, you navigate to Floodlight tag preview and copy the tag source there. Don’t forget to replace variables like Revenue and Order ID with the respective variables on your website.The second method which we highly recommended is through Google Tag Manager. There are two ways to add Floodlight tags to a GTM container:-
- Push the tag from Campaign Manager user interface to GTM.
- Directly add the tag from the Google Tag Manager user interface.
#Push Floodlight tags from DCM to GTM
In order to be able to push or send tags from DCM to your Google tag manager container, you need first to establish a link between the two platforms. To do so, navigate to your DCM and select your tag under Floodlight Activity tab. Then, Expand the Google Tag Manager section and click Link to a Google Tag Manager container.
After you enter you Container ID, a link request will be sent to your Google tag manager in which you need to approve the link request and pushed tag. To accept a pushed Floodlight tag, navigate to Approval Queue → Tags in your Google tag manager Container.
Before you publish the tag live, you need to configure and assign the relevant variable for each parameter. By default, when you push a tag from DCM to GTM, it comes with the below placeholder variables in which you have to replace and set your trigger. For example, you can see below that Revenue is assigned to {{cost}}, you will need to replace this {{cost}} GTM variable with your revenue GTM variable that captures the revenue amount.
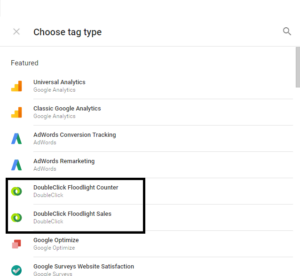
#Directly add the tag from the Google Tag Manager user interface.
Navigate to Tags in your GTM container and select DoubleClick Floodlight Sales as the Tag Type.
Click Continue and configure your tag.
To find the correct info for your tag, navigate to Floodlight tag preview in your DCM and expand it to display the tag. Your tag snippet will look like below:
<img src=”https://ad.doubleclick.net/ddm/activity/src=222222;type=DCMIm0;cat=Flood0;qty=1;cost=[Revenue];dc_lat=;dc_rdid=;tag_for_child_directed_treatment=;ord=[OrderID]?” width=”1″ height=”1″ alt=””/>
- Find the value of “src= ” and enter it into Advertiser ID.
- Find the value of “type= ” and enter it into Group Tag String.
- Find the value of “cat= ” and enter it into Activity Tag String.
For the rest of the information, you will have to assign each value to the relevant variable. For example, for Order ID, you will have to select the GTM variable that captures the transaction id. Once you have completed entering the tag information and selecting the right trigger, click save and go ahead and publish the changes.

Entrepreneur focused on building MarTech products that bridge the gap between marketing and technology. Check out my latest products Markifact, Marketing Auditor & GA4 Auditor – discover all my products here.
Hi,
Would like to check how mobile tracking works if we are using DCM?
If banner is shown in mobile app, user is landed on mobile web environment after they click on the banner, will this landing recorded by the floodlight tag being attributed to the mobile placement?
How can we pass back device id to floodlight tag if the floodlight tag is implemented on the web environment?