
The A-Z Guide to Google Optimize
What’s Google Optimize?
Google Optimize is the free version of the enterprise solution Google Optimize 360. It’s Google’s A/B testing and personalization platform. Like most A/B testing platforms, it allows users to run experiments and test variations of a site in order to optimize the conversion funnel and users’ experience. Moreover, it natively integrates with Google Analytics, which makes it much easier to access the data from GA and gives more advantages over other testing tools.
What’s the difference between Optimize and Optimize 360?
Optimize 360 is a premium, enterprise testing tool designed for larger enterprises with sophisticated needs. While Optimize is free, mainly for Small to medium-sized businesses just getting started with experimentation. Optimize is currently limited to 1 account and 1 container and lacks some features like GA audience targeting.
How to set up Google Optimize?
- Create your Optimize account and container
Sign in Google Optimize and click “Create”. Then add and name your container.
2. Link Google Optimize to Google Analytics
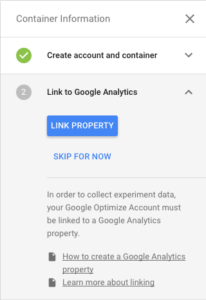
Once you’ve created your container, it’s time now to link your Optimize to your Google Analytics. From the panel on the right side of the screen, click ” Link Property” and select the Analytics property that corresponds to the web domain on which you’ll be running experiments.
3. Install Optimize Snippet
Once you’ve created your Optimize container and linked it to your Google Analytics property, you’re ready to add Optimize to your web pages. In this guide, we are going to deploy the Optimize snippet via Google tag manager.
You only need two pieces of information to be able to implement Optimize via GTM:
# Analytics Property ID
# Optimize Container ID
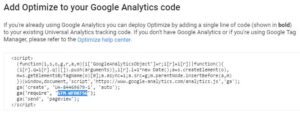
To get your Optimize container ID, click “View Snippet” from the container info panel.
Your container ID is the single code highlighted in blue as you can see below:
Go to your GTM account, add a new tag and select “Google Optimize”:
Add your Analytics Property ID and Optimize Container ID:
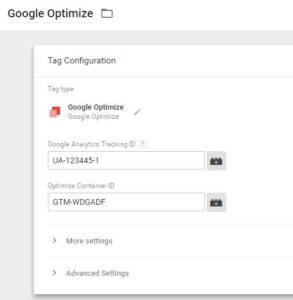
Click Triggering and choose or create a Page View trigger to fire on all pages (recommended) or specific desired pages.
Don’t forget to configure the Fields to Set and Advanced Configuration with the same values as your GA tags.
4. Add the hidden snippet to your website
The page hiding snippet below is optional but recommended because it prevents users from seeing your web page before a variant is applied, minimizing page flicker. Copy the code below and add it to every page with Optimize as early in the <HEAD> as possible before your GTM tracking code.
How to Create experiments in Google Optimize?
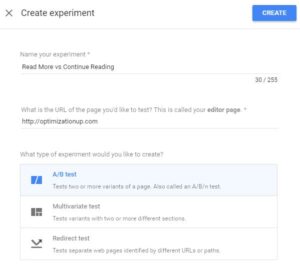
Now we are all set to create experiments through Google Optimize. Optimize has 3 types of experiments:
A/B tests
It is a randomized experiment using two or more variants of the same web page (A and B). Variant A is the original. Variants B through n each contain one or more elements that are modified from the original. For example, a different colored call-to-action button. In some experiments, variant B may be a completely different version of a web page.
Redirect tests
A redirect test, (a.k.a. split URL test), is a type of A/B test that allows you to test separate web pages against each other. In redirect tests, you identify variants by URL or path instead of an element(s) on the page. Redirect tests are useful when you want to test two very different landing pages or a complete redesign of a page.
Multivariate tests (MVT)
A multivariate test (MVT) tests variants of two or more elements simultaneously to see which combination creates the best outcome. Instead of showing which page variant is most effective (as in an A/B test), MVT identifies the most effective variant of each element as well as analyzing the interactions between those elements. MVT tests are useful for optimizing multiple aspects of a landing page, for example.
Please visit Optimize’s help center for more info about experiment types.
Give your experiment a relevant name and then specify the URL of where the experiment will take place , and finally select your experiment type. In this example, I am trying to A/B test the text of the CTA on my blog homepage; “Continue Reading” vs “Read More” to see if it will improve my page views and decrease the number of bounces or not.
1. Select your Objective
Your experiment’s objective is defined as “the website functionality you wish to optimize.” Common objectives for publishing websites are pageviews and subscriptions, while e-commerce websites tend to use objectives like revenue and conversions. Objectives are an important part of Optimize because they inform the statistical model that’s used to pick leaders and determine how your variants perform against your original.
In general, Optimize has three default objective (page views, session duration, and bounces). In our example, I picked “pageviews” as the primary objective and my secondary objective “bounces”. As I want to see the impact of changing the button text from “Continue reading” to “Read More” on my pageviews and hoping for a bounce rate drop.
2. Create Variants
Before you go ahead and create your experiment variants, you need to know first “Who to target?”. The Who section of the Targeting tab is used to select the visitors to whom you wish to target your variant. Enter a numeric value or use the slider to specify the percentage of your visitors to include in your experiment.
So before I start testing, I need something to start testing on. As mentioned before, I will be testing the text of the CTA on my blog homepage, “Continue Reading” vs “Read More”.
3. Use visual editor
When you create a variant of a web page you’ll be taken to the Optimize visual editor which allows you to create variants quickly and without having to re-code. It looks like below, in our example, I managed to change the text of one of the buttons from “Continue Reading” to “Read More”
4. Weight your Variant
All variants are weighted equally by default in Optimize. A visitor who is included in your experiment has an equal chance of seeing any of your variants. If you want more (or less) traffic to go a specific variant, you can adjust the Weighting of visitors to target. In our my experiment, I will make it 50/50
5. Select your Targeting
Optimize targeting allows you to choose who is eligible to be in your experiment, and when they’re served experiment variations. Optimize includes two controls for targeting: Who and When.
The When section of the Targeting tab determines where the experiment is shown. Use the rules to set where your experiment is seen. To create a targeting rule, click AND, then select a targeting rule type.
Optimize includes many targeting rule types, which you can read more about in the help center.
6. Preview Changes
7. Start the experiment and Report

Entrepreneur focused on building MarTech products that bridge the gap between marketing and technology. Check out my latest products Markifact, Marketing Auditor & GA4 Auditor – discover all my products here.

Hi
Thanks for the instructions, but I have a question. How do you actually set up the goal? I would like to test different call to action buttons for amazon affiliate links, but can’t see how to do that in the goals section.
Thanks!